How To Use X-Arcade With Raspberry PI
IMPORTANT NOTES:
- Our new Tri-mode PCB works on the Pi right out of the box in mode 4, so you can skip most of the steps here to the layouts below!
- The X-Arcade acts like a keyboard when using the default USB cable that comes with it (just like on a PC), the Xarcade2Jstick user-space daemon (made by Florian Müller) will make it act like 2 gamepads instead. The trackball acts like a mouse. Use the layout below when setting up your controllers.
- You can instead use our Tri-mode PCB or Xbox 360 adapter to make it act like 2 Xbox 360 gamepads which gives you more functions such as switching between analog and D-Pad controls and is probably easier overall since you don't have to use the Xarcade2Jstick.
- Start by making sure your controller is working on a PC with our test program. If it doesn't work on PC it's not going to work on a Pi either.
- These require .78 MAME ROMs.
- RetroPie vs. Recalbox - Lifehacker DIY Retro Game System Showdown - The general consensus we've seen is that Recalbox is easier to set up and has all the features that most people want and just works, while RetroPie has more customization but is more for advanced tinkerers. Users have likened Recalbox to iPhone and RetroPie to Android. For this reason, we recommend using Recalbox for most users. We do not offer direct support for either of these, however.
- We offer no support for any of this, but we did our best to make it as easy as possible for you to get up and running as painlessly as possible. Links to get support are provided below. If you downloaded or purchased some other Pi setup rather than use the guide below installing from scratch, you very well may have other problems not addressed here.
- PI 4:We've heard some bugs reported with various game controllers and PI 4. With X-Arcade or any game controller, unplug the game controller, or USB for X-Arcade after the PI is running, then plug back in and trackball/X-Arcade will work. This bug impacts a number of USB devices with PI 4. We have no other solutions for it until they fix.
imageRecalbox:
Recalbox allows you to re-play a variety of video game consoles and platforms in your living room, with ease! RecalboxOS is free, open-source and designed to let you create your very own Recalbox in no time!
Recalbox Setup:
Recalbox Official Setup Guide (download the Burnable .img) Recalbox Video Setup Tutorial
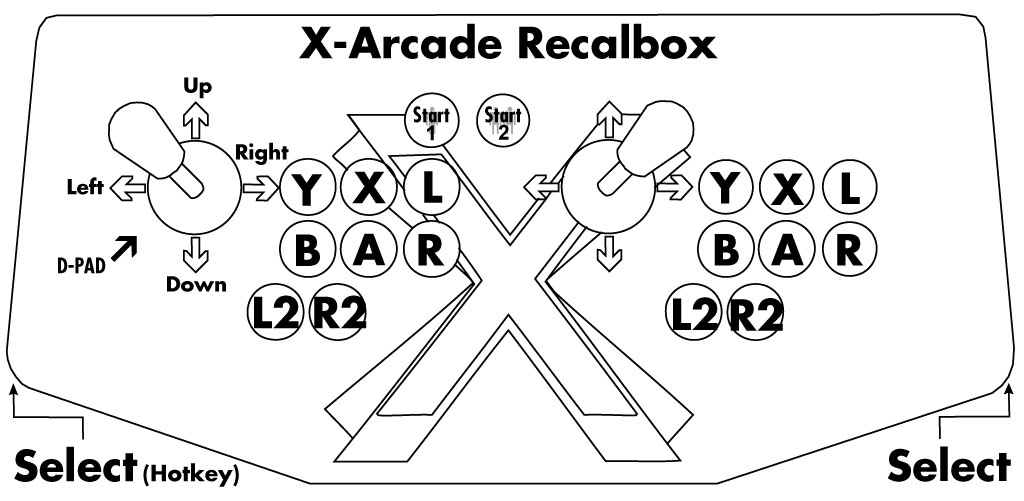
Recalbox Hotkey = Left Pinball Button
Exit Emulator = Select(Left Pinball button)+Start 1
Per-Emulator Custom Controller Mapping (doesn't work with MAME or N64).
Logging into your Recalbox to add files and ROMs (on a PC connected to the same network):
Method 1: Open File Explorer and look under Network for your Recalbox, or put \\RECALBOX\share\roms in the address File Explorer bar. Add ROMs to the correct system folders found in \share\roms\ (MAME ROMs go in the mame directory).
Method 2: Open a web browser to <http://recalbox/>
To force rescan of new games, press Start >Game Settings>Update Games Lists
Layout Fix for N64:
For N64: Rename the file \\RECALBOX\share\system\configs\mupen64\mupen64plus.cfg to save it as a backup, then put our mupen64plus.cfg file in this folder.
Recalbox Support:
RetroPie
 RetroPie allows you to turn your Raspberry Pi into a retro-gaming machine to enable you to play your favorite Arcade, home-console, and classic PC games with minimal setup. Start with the beginner's guide (with video guide) to the right.
Important Notes:
-
- Our new Tri-mode PCB works on the Pi right out of the box in mode 4, so you should skip installing Xarcade2Jstick and simply Update RetroPie-Setup script and map the controls to use this layout. Then start at Step 3 below
- NOTE NOTE NOTE:
- So you should skip installing Xarcade2Jstick" insert "and instead install the xpad driver (in the RetroPie Setup menu, go to Manage Packages > Manage driver packages and install)" We testeda Raspberry Pi 4b (4GB) with RetroPi v. 4.7.11.. .This applies to the Tri-Mode PCB in mode 4 (Xinput). The tankstick is recognized as an X-box 360 wireless controller, but without the xpad driver installed, one cannot configure the LT and RT buttons.
- Mode 3 works too, but there is a bug that makes the trackball not work when in mode 3!
- Hit F4 on your keyboard anytime you want to get to the command line (while not in a game). Then type sudo reboot to reboot the Pie without unplugging it.
- RetropPie Setup can also be accessed by the command line, just type sudo /home/pi/RetroPie-Setup/retropie\_setup.sh (this is CaSe SeNsItIvE) and press Enter.
- To update or uninstall Xarcade2Jstick, go to RetropPie Setup, then go to Manage packages>Manage driver packages>xarcade2jstick and either update or remove it.
- To reset controller configs (if controls are messed up), go to RetropPie Setup>Manage packages>Manage core packages>emulationstation>Configuration/Options and choose 'Clear/Reset Emulation Station input configuration'. Reboot.
RetroPie Setup:
Step 1 - Download and Write Image to MicroSD: Follow the RetroPie Official Installation Guide, but stop at 'Configure Controllers'.
Step 2 - OLDER MODELS ONLY - SetupXarcade2Jstick: If you have a newer model with the Tri-Mode PCB then you should not use this, just use mode 4.Otherwise, RetroPie can use Xarcade2Jstick to make older model X-Arcades register as two individual gamepads (instead of one big keyboard) in Mode 1. WARNING: There is a known bug that causes the trackball not to work on the Raspberry Pi 3 Model B+ when Xarcade2Jstick is installed.
Note: At first boot, RetroPie requires you to set up a controller, for that reason the workaround steps for getting the Xarcade2Stick working are more complicated than should be necessary (you would be able to skip steps 1 and 2 below). The RetroPie devs really should make it possible to skip this entirely for keyboard-only use.
Steps:
- While at the RetroPie WELCOME screen, press F4 on your connected keyboard to get to the command line.
- Type sudo raspi-config and press Enter to open RetropPie Setup. Choose '2 Network Options', and connect to your Wifi network. It will show your IP address if connected properly.
- Follow the video instructions (made by our friend ETAPRIME) below to finish setup, but we do recommend mapping to this layout:
Step 3 -Adding ROMs:
Method 1: Open File Explorer (on a PC connected to the same network) and look under Network for your RETROPIE. If it doesn't show up try putting \\retropie in the address bar. Put ROMs in the correct folders, arcade ROMs go in the 'arcade' folder.
Method 2: Enable SSH, then use an FTP client such as Filezilla to log into it. Host: retropie, Username: pi, Password: raspberry, Port: 22
Method 3: Put your ROMs onto an external USB thumb drive as shown here.
NOTE: To force rescan of new games, press Start >Quit>Restart EmulationStation
Step 4 - Play!
For arcade games be sure to choose lr-MAME 2003 as your emulator for full trackball support. You can also add other MAME builds like Advance MAME and MAME 2003-Plus (from the RetropPie Setup>Manage packages menu), but you will have to configure the controls for them (some added info on these further below). (MAME4all is not recommended in general and it requires additional setup. See MAME4All Controls section here if you decide to use it anyhow for some reason, but also note that it does not have trackball support!)
Other notes:
- Exit Emulator = Select(Left Pinball button)+Start 1
- Retroarch Menu = Select + X (Retroarch-emulated games only)
- Mega Drive: Enable 6-button mapping = Open Retroarch Menu>Quick Menu>Options and set the two Input devices to '6 button pad'.
- Controller Remapping Per-Emulator
- You can use HDD Raw Copy Tool to clone your microSD to another microSD of the same or even bigger size.
MAME 2003-Plus :
Retroarch Menu = Select + X, go to Options and change 'Control mapping' to 'digital'.
AdvancedMAME :
Press TAB on your keyboard to setup controls.
Layout Fix for N64 & Dreamcast:
Note that if you reconfigure your controllers again you will need to replace the files below again.
Place the InputAutoCfg.ini and mupen64plus.cfg file in /opt/retropie/configs/n64/ with the ones in the .zip file.
Dreamcast: Download this .zip file
Replace the file /opt/retropie/configs/emu.cfg with the one in the .zip file.
Put the 2 'controller\_Xarcade-to-GamepadDevice\*.cfg' files in /opt/retropie/configs/dreamcast/mappings/
RetroPie Support: RetroPie Official Documentation RetroPie Forums Reddit r/rRetroPie

PiMAME
Stay up to date withPiMAME + X-Arcade Integration Here. - Thanks to Shea Silverman!
Here is his page on setting things up.
MAME4 ALL:
Setting up with MAME4ALL + PI - byAaron Ardiri
<http://www.xgameroom.com/service/images/Layouts//RetroPie-RaspberryPi_X-Arcade.jpg>
PI 4
- PI 4: We've heard some bugs reported with various game controllers and PI 4. With X-Arcade or any game controller, unplug the game controller, or USB for X-Arcade after the PI is running, then plug back in and trackball/X-Arcade will work. This bug impacts a number of USB devices with PI 4. We have no other solutions for it until they fix.
Source article: <https://support.xgaming.com/support/solutions/articles/5000554993-how-to-use-x-arcade-with-raspberry-pi>